Compound bow components
1 Components - high level overview
2 Riser
The riser of any compound bow is a very important part of how the bow actually works and feels. Although there are no moving parts, this can have a great deal of influence on how the bow shoots. The riser is what determines many attributes from brace height to the axle to axle length and the speed and accuracy. Along with these, it is where the majority of the weight is found. Some risers have many cut outs that reduce the weight and some look like a solid piece of metal that will feel very heavy. Risers have come a long way in the world from the days of old in 1969 with the birth of the compound bow, but in reality the concepts and a lot of the technologies are still the same.
2.1 Construction (Deflex vs. Reflex)
| click on any pic to enlarge | ||
 | 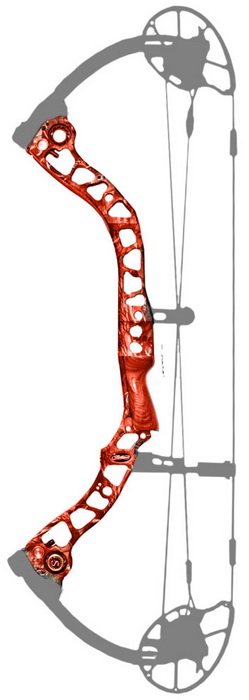 | |
| Deflex riser - Slower speeds but more forgiving | Reflex riser - faster speeds but less forgiving | |
To really grasp the difference between reflex and deflex you will need to know what the difference is between the two and what it actually means. Reflex and deflex is measured by drawing an imaginary line from the forward most part of the riser where the limb connects from the top down to the same spot on the bottom of the riser. Now with that line in place just look at where the throat of the grip is; if it is in front of the imaginary line, it is a deflexed riser and if it behind the line (towards the shooter) it is a reflexed riser. It’s pretty simple to glance at a bow and decide if it is indeed a reflex or deflex riser, however it is becoming more and more difficult to find a bow that utilizes a deflex riser.
The age old question of Deflex vs. Reflex is an ongoing battle and will probably continue to be for many years. These are the two riser attributes that have the largest affect on the bow. With one you will experience a smoother draw cycle and a little bit more forgiveness while sacrificing speed (Deflex). The other (Reflex) will be noticeably faster but be a little less forgiving. Now let’s get into this in a little bit more detail.
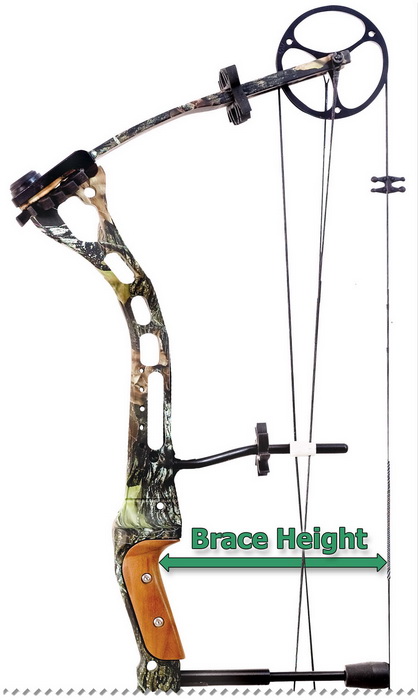 |
| Brace height varies based on riser construction (deflex or reflex) |
To better help understand the difference between reflex and deflex you need to first know the definition of a bows brace height and the effect it has on the shootability of a bow. Brace height is an important measurement that is heavily advertised by most companies so there’s another reason to know what it means. The distance between the throat of the grip and the string at rest is what gives you your brace height measurement. A longer brace height is more forgiving because the arrow is in contact with the string for a shorter period of time which takes more human error out of the equation. This is also why a longer brace height bow is slower, less time with force pushing the arrow forward equals not as much momentum built up, therefore less speed. Everything is the exact opposite with a short brace height bow, the string stays in contact with the arrow for a longer period of time during the shot which creates more momentum but at the same time allows for more human error.
2.1.1 Deflex risers
 |
| Deflex risers - grip throat is in front of pivot point line |
Although this seems to be a design of the past, there are still companies that produce deflex risers. As mentioned above, the deflexed risers are more forgiving; this is because of the added brace height from where the grip is, in relation to the limbs that the string is connected to, and longer brace height will mean more forgiving. The reason that this seems to be a bow of the past is because everyone’s obsession with speed and the fact that deflex risers aren’t as capable of producing the same speed as a reflex riser. Another benefit to a deflex riser is its ability to aim easier; the geometry of this design causes less torque to be transferred into the bow because it requires more pressure to cause a lateral movement. Therefore it will be easier to hold plum which will decrease the chance for left to right misses.
2.1.2 Reflex risers
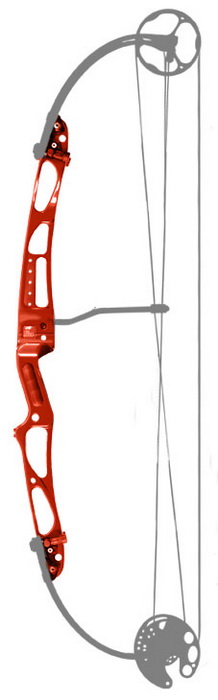
 |
| Reflex risers - grip throat is behind of pivot point line |
Without a doubt the most popular type of riser on the market is the reflex, due to its ability to generate the greatly desired speed. With the speed comes the lack of control and forgiveness. Unlike deflex, this riser will have a shorter brace height due to the orientation of the grip with that imaginary line. When more vertical limbs were the norm, the brace heights were very short, but with the introduction of parallel limbs this problem was more or less resolved. While still being considered less forgiving bow manufacturers were capable of producing brace heights of over seven inches, which has become the number that everybody listens for. The way parallel limbs can negate the problem is by using a longer limb that comes off the riser at a more extreme angel in an attempt to get the string a little farther from the grip. Even when manufacturers are capable of making brace heights a little longer, the reflex riser is still considered a little less accurate. This is because of leverage; there is more of the bow in front of your hand which makes it a little easier to torque and cause right to left misses.
2.2 Riser material
Seeing that the riser has to have the ability to not bend or warp under the pressure of the shot cycle, companies have to find a very strong and durable material. Nine out of every ten modern day compound bows will have an aluminum riser. Most bow risers are made from aircraft grade 6061 aluminum alloy(mixture of aluminum, magnesium and silicon), and actually 6061 T6 is more likely going to be the metal you will find in risers. This is an excellent compound because once tempered it is extremely rigid while keeping the original properties of aluminum. Another benefit to aluminum is that it is very corrosion resistant so it can withstand the rigors of being outdoors in all types of weather without suffering much damage. Yet another benefit is the weight, this may be the attribute that is most important to the shooter. Imagine that if the riser was built out of steel; assuming that the riser had all the same dimensions, the steel riser would weigh three times more than the aluminum.
Another material would be magnesium, this is a great compound because it is naturally strong and fairly light weight. This isn’t as popular as the other metals, but with a magnesium riser you will have a fairly inexpensive riser that will still be of great quality. One set back is that magnesium is a material that naturally tarnishes when exposed to air, but with a quality top coating this problem will be eliminated.
2.3 Cast vs Machined
This was a heavily debated topic for years and sometimes it still is; but for shootability, there is basically no difference between a cast riser and a machined riser. Unless you take into account that the cast riser will more likely be a little wider because they are usually a little weaker than a machined riser. One of the largest differences between these two is the cost, for the company and for the customer. Cast bows are a little bit more affordable because the process in the long run ends up being cheaper for the company. To start making cast risers the initial cost is high because of design issues and the difficulty of making changes to the mold, but once things are perfected the cost drops off dramatically. Most companies make so many changes from year to year that this isn’t the best business decision for them so they lean more towards machining their risers.
Another difference that can be seen or differentiated between the two types of risers is the finish itself. This is where the cast riser shines brightly. With most machined risers, if you look close enough you will see machining marks in certain places of a riser. A lot of companies however go to great lengths to limit imperfections in their machined risers and sand or grind them smooth. These marks are usually noticeable in small holes, indentations or sharp inside corners. However, with cast risers, there are ingredients poured into a mold and then they are pressed together and heated making a fairly smooth riser to begin with. However, some believe that this pressing isn’t sufficient enough to eliminate voids in the end product which cause weakness and could lead to riser failure. That brings up the fact the machined riser is the stronger of the two methods, but both are very strong and can handle the rigors of being used in a variety of situations.
2.4 The Growing Riser
If you were to take a look at one of the compound bows from 10 years ago you would probably find a riser that is considerably shorter than today’s riser. This is because of the reflex/parallel limb combination take over, as the limb angles get larger, or closer to 90 degrees, the riser has to get longer to create a longer axle to axle. If you were to put parallel limbs on a bow from 10, or better yet 15, years ago, you would have a bow with a 19” or 20” axle to axle and it would be practically impossible to shoot. With the growing length of the riser came a heavier bow which brought about cutting out parts of the bow into a grid like pattern in an attempt to cut down as much weight as possible, while still having a strong/rigid riser.
3 Limbs
There are many great debates when it comes to choosing the right limbs; while some of these debates can really give you some noticeable positive gains, some are more like asking the question “Ford or Chevy” at a Nascar race. Regardless of what limb type is brought up in a discussion there will always be someone that will have something negative to say. There are a lot of parts that go into making a compound bow do its job and the limbs might be an often overlooked.
3.1 Purpose of limbs
The role that the limbs play in the shot cycle and the longevity of a bow are fairly large. They are important because the limbs are what store the energy for the shot, this simple action of storage is maybe the single most important part of a bow because if a bow doesn’t have the ability to store the energy that you expel while drawing, the bow will not shoot. The process begins as you start to draw the bow back. The limbs will immediately start to either compress together or pull back towards the shooter, eventually the cams will do their job, and like a pulley, it will feel like you aren’t holding the 50,60 or 70 pounds of weight, but this potential energy will still be stored in the limbs. This energy can be held in the limbs for as long as a shooter can stand to hold it, until the shot and then all of this stored energy is transferred from the limbs into the string and then into the arrow.
Longevity was mentioned because the majority of failures come from the limbs in one way or another (this will be discussed further).
3.2 Limbs construction
There are several different materials used in the construction of a limb and there are many different ways that companies put these materials together. The list of materials isn’t a long one, there are fiber glass and wood, but it’s not that simple. The glass limbs can have different materials added in, like carbon fiber which will slightly change the attributes of the material and the overall weight. Wooden limbed bows are just that, the limbs are made out of layers of wood, most wood limbed bows these days have other components layered into the limb, with that comes the next topic.
3.3 Laminated vs. Solid glass
Through the years the debate of laminated or solid glass limbs has always been around. Both have their benefits and also, each will have a drawback or two. This day and age every bow company will use a limb that is very strong and accurate and should have a very low failure rate. However, there are still many people that will always go with one or the other and always have negative things to say about the type that they don’t shoot.
Laminated limbs have been around for a long time, even longer than the compound bow, because this was a popular way to build a limb for long bows. These limbs are basically limbs that are built by layering together different types of materials, be it wood, fiber glass, or carbon fibers. Between each layer there is an adhesive used and the limbs are heated and pressed together. This adhesive between the layers is the first point that is prone to failure. Laminated limbs are known to not make it through a hot day locked in a trunk because the heat can get high enough to break down the layer of adhesive causing a delamination. A shooter might not notice that the limbs has delaminated until they go to shoot the bow which can end tragically, so always remember to not leave a laminated bow in your trunk. The good for the laminated limbs to many people out way the bad. They are a smoother drawing limb because they can spread the flexing over a longer length of the limb and generate less hand shock as well. They are more popular on longer axle to axle bows because they are normally longer and don’t handle as much pre-stress as well as solid limbs
Solid limbs are exactly that, a solid piece of glass/graphite that is either compression molded or extruded. The down side to both of these is there is noticeably more hand shock than laminated limbs but the parallel designs of today’s bows cancel out most of the hand shock anyway so it’s tough to say that this is a drawback. They can also cost a little bit more than the laminated limbs will cost. However there are some great features that come with solid limbs, especially compression molded limbs. With compression molded limbs the fibers that make up the limb are comparable to oriented strand plywood. This is important because it practically eliminates cracks and splits because the fibers are uni-directional, which also are very strong laterally which increases accuracy. Extruded glass limbs are a lot different; the way that they are designed isn’t as strong because the fibers only lay in one direction so splitting can easily happen. Neither of these types of glass limbs are affected by heat but some can argue that they can have a decrease in speed in extremely cold conditions.
3.4 Split vs. Solid
One of the most volatile debates in modern day archery has to be the big question of split or solid limbs. Split limbs have many great selling attributes; they are very strong, they spread stress out over the length of the limb, a little bit lighter and if the limbs have wide stance they can reduce torque. However, on the other side of the spectrum for split limbs is the fact that there are four limbs instead of two. Therefore, the limbs have to be built exactly the same because if there are slight differences between them it can cause numerous problems from; cam lean, riser torque, limbs twisting and it can make tiller tuning a real bear (for those that tiller tune).
Solid limbs have been around for years and this has allowed for many tweaks to be made for improvement. Most people are quick to jump on the bad when it comes to solid limb designs. First and foremost, solid limbs are known to fail in the v-notch for the cam; the limbs can split and run up through the center. With the development of compression molded limbs the chances of a limb splitting has been greatly reduced Also as a con, they build up most of their stress in a short length of the limb instead of spreading it out evenly. The benefits of solid limbs are their ruggedness, simplicity and stability.
Basically, both are great products and it’s hard to pick a real winner between the two different limbs. A lot of people base their decisions solely on looks and feel. Try to keep in mind, when you are looking for the perfect bow that has all the perfect components, these bow companies have a reputation to up hold so they will not be releasing something that will not work well.
3.5 Parallel/Pre-Parallel/Past Parallel
Around 2004 people started screaming for a bow that had less hand shock; this caused multiple bow manufacturers to come up with a plan to do just that. This is what gave birth to the paralleled limb bow, Bowtech and Mathews were the two companies that that more or less spear headed this push to satisfy the consumer’s desires.
Parallel limbs decrease the amount of hand shock very well; this happens because instead of the limbs moving forward, away from the shooter, they move away from each other. The two limbs moving away from each other cancel out most vibration that is felt by a more traditional limbed bow.
More recently a few companies have been going past parallel. While being practically the same idea as parallel designs, these limbs will go past that and point down toward the shooter. The limbs on this style of bow are greatly pre-stressed and will most likely have split limbs. This style of limb has slightly less recoil and noise because the limbs have a little more cushion when they return to rest. Most bows that have past parallel limbs are extremely fast, but the draw cycle can seem a little rough.
3.6 Limbs and Shootability
Seeing that the limbs generate the power for the bow, it is easy to say that they can have an effect on many aspects of the shot. How the limb bends as it loads up pressure is the biggest factor that is felt by the shooter. If it bends over a larger length of the limb it will feel a bit smoother as opposed to bending in a short span of the limb. Most people believe that the poundage has the largest effect, and as far as the feel of the draw it does; but as far as speed that is achieved, this is a common misconception. Speed is achieved with a ratio of arrow weight to draw weight. Advertised IBO speeds are figured at a 70 lb draw weight at 30” draw length with a 350 grain arrow. With that people assume that a 70 lb draw weight bow is the only way that a bow can hit those advertised speeds. What it comes down to is that the arrow is at five grains of weight for every pound of draw weight (5 X 70=350). That ratio continues through all weights, so if you are a 30” draw but shoot at 60 lb bow you can still hit the IBO speed if you shoot a 300 grain arrow. With that being said, the draw length is where the speed loss can come from. A good rule of thumb would be, for every inch of draw length less than 30” can decrease speed by 10 fps. So what we are getting at is that draw weight isn’t everything when it comes to speed.
4 Eccentric system
When it comes to the overall feel of the bow, folks are actually referring to the eccentrics system. This is where all the engineering is put to the test for real world shootability, speed, and performance. The feel of the bow, the draw cycle, and making sure the rig is properly tailored to each shooter lies with the eccentric system, a large part of which is dedicated to the cam system. In the recurve bow days, the machinery behind the arrow being powered down range was a bit more simplistic than the compound bow market today. The eccentric system works to help the shooter draw the bow with less effort, storing high amounts of energy that will be released to flinging the arrow down range. The cams (the wheels) are truly what sets compound bows apart from everything else, not only from and efficiency stand point, but from a mechanical perspective as well.
4.1 Purpose of eccentric system
The eccentric system is engineered to maximize the amount of stored energy the bow can produce while minimizing the amount of effort you need to draw and hold the bow through the complete draw cycle. Although each cam is designed differently, the purpose remains the same. When tuned correctly, cams perform mechanically the same way shot after shot, eliminating mechanical errors. This leaves any errors in performance on the shooter instead of the equipment.
4.2 Types of cams
Every cam is engineered slightly different depending on what the bow is designed for. Bows designed for speed are generally speaking more aggressive in looks and draw force curve while bows designed for smoothness are often more circular in shape and easier to pull. There are bows that break these norms, but generally speaking, this is the conscientious. Every cam system can be fit in four major categories: single cam, dual cam, hybrid cam, and a binary cam. Although they are designed differently based on their purpose and offer a variety of positives and negatives to match shooters personal preferences, most companies produce a variety of cam styles.
4.2.1 Single cam
A single cam bow features a round idler wheel on the top, and a cam designed to handle the workload on the bottom. The idler wheel just serves as a surface for the string to be drawn over, and has no mechanical function in how the bow performs. The bottom cam not only keeps the nock in line throughout the draw cycle, it also flexes the limbs towards each other and stores the energy the bow will use as the arrow is released. Single cam bows have the full spectrum of draw force curves, aggressive to smooth, fast to slow. Single cams are typically quieter, but that generalization cannot be applied to each and every single cam bow design. A huge advantage of a single cam system over other styles is they do not have to be in sync with another cam. If any stretch occurs in the string, the single cam will still be in sync with itself. Single cam bows can be out of tune as well, but fixing the issue is often an easier process because there are less variables.
4.2.2 Dual Cam
Dual cams are also known as two cam systems or twin cams as well. These systems have a cam on the top and bottom that are perfectly symmetrical in shape. When properly synchronized and tuned, nock travel is perfect, and the bow is able to shoot really decent speeds and meet high performance standards. Early on, these cam systems had trouble with timing and synchronization leading to accuracy problems and frustrating shooting sessions. Any stretch in the string or cable will cause the cams to become out of sync and not shoot properly. When the cams do not roll over the same way they are designed to, they do not shoot the same, they feel different from shot to shot, and they fling arrows off target. Many of these issues have been corrected by using better materials to produce the high-end strings and cables featured on rigs now. Unfortunately early design problems forced many shooters to try different style cams and made them leery to give the dual cam another change. Like other types of cams, there are good and bad designs of this system, but when properly tuned they function very well.
4.2.3 Hybrid Cam
Like the name suggests, hybrid systems are a mix of what shooters like about single cam systems and dual cam designs all wrapped into a single package. The top and bottom cam of the hybrid setup are asymmetrical and work with each other. The bottom cam supplies the power, while the top cam operates to further control the cycle. Functioning with a string, one harness, and a cable, the strings have less of an influence on synchronization and the headaches caused from shooting the bow. In other words, when cables stretch, each cam is able to adjust making it less of a tuning issue. Although the hybrid cam is not completely maintenance free, it does take a step in the correct direction assisting with nock travel while minimizing tuning issues.
4.2.4 Binary Cam
Binary cams are the final style of eccentric systems to talk about. Binary cams are different from the other three in that each cam works in relation to the other although they look like a dual cam on steroids. Unlike the other styles we have discussed so far, the binary cam system works in direct relation to each other similar to that of a mirror. Cables are anchored to the cams instead of the opposite limbs, which means they have to work together regardless of changes in string or cable stretching. Theoretically, tuning issues such as cam synchronization are eliminated with this type of cam, although in practice it does not always work out as well as the engineers planned. Many shooters have made the switch to this style based on their ability to further eliminate the dreaded string and cable stretch issue.
4.3 Adjustability
Cam adjustability is really about making the bow perfectly fit the shooter's specifications. Draw length, draw stops, and let-off are some of the main adjustments and they are all related to how a bow fits and feels. The key to understanding adjustability is that a lot of it is based on personal preference. There are tons of options and styles available because there are many personal preferences shooters prefer. Most of the time, these alterations will not drastically change how the bow shoots and feels, but changing things like where the draw stop is located can impact the holding weight, and what the valley feels like as well.
Perhaps the single most important adjustment option people are interested in is the draw length. Without a proper draw length, accuracy will suffer, and the other adjustments will not be as beneficial as they could be. Draw length can be a little tricky based on the cam itself. Cams are either draw length specific, or require modules to change. Although the range of draw lengths varies from bow to bow, most manufactures offer half inch increments in draw length, with some minor changes possible through manipulating the string and adding or taking away a few twists here and there. However, these should only be done for minor adjustments.
Draw length specific cams requires removing the entire cam and replacing it with a completely different one. Shooters interested in doing this will need access to a bow press and several tools to help with the work. Draw length specific cams are often much more expensive to change than module based cams and are a little more labor intensive. With that being said, draw length specific cams are not weighted down by a module or extra parts, which may make it a little faster than if the cam was designed to accommodate a large range of draw lengths.
Module based cams come in a few different varieties as well. Some bows are produced with draw length modules that can be swapped out for different draw length modules. The incorrect module is removed, and the new module replaces it. The cam does not change, but the module controlling the draw length is. Some bows do not even require a press to remove the module, but there are others that will require the bow to be pressed in order for the new module to be placed on the cam. These modules are not too pricey to purchase and the work to change them is relatively minimal.
Many manufacturers are including the entire draw length spectrum all together in one module as well. The cams are drilled with different holes and the module is simply rotated along the existing holes to line up with the proper draw length. Although the bow may need to be pressed depending on the location of the screws, the module costs nothing to change and the labor is relatively easy. Most cams that feature the all in one module have laser engraved markings for where the module should be placed to achieve the desired draw length to make it easy to reference. With the all in one module, the draw stops will need to be changed as well to match the same position the module has been placed in to give the bow the proper valley.
Along with the draw length, some bows also offer the ability to adjust the draw stops or the let-off. Depending on the type of cam, the draw stops will either make contact with the cables upon full draw or the limbs to prevent over drawing the cam and provide more solid back wall. Between the two back walls, those designed to contact the limbs are typically more solid than those contacting the cables partially because the limbs have less give when pulled against. Keep in mind that changing the draw stops will impact the let-off percentage as well as the valley of the bow. Although most times this is not going to greatly impact how the bow feels, large adjustments may be noticeable.
4.4 Cam aggression
Cam aggression describes how harsh or smooth the draw cycle looks and feels. Often times, cam aggression is directly related to speed as well. There are a few bows on the market that are smooth drawing and produce great speeds, and there are some harsh drawing bows that do not display great speeds. Generally speaking though, cams with an aggressive draw cycle store more energy and produce faster speeds than less aggressive designs.
4.5 Valley
The valley is not something shooters will see on the specification sheet for their next potential bow, but it is something felt in the draw cycle of every bow. The valley is the amount of play shooters have after reaching the back wall, or the maximum let-off, and how far the strings can be let down before the let-off starts to reverse and the string wants to jump forward. Some refer to this as movement as “creep.” Cams featuring the ability to change the let-off by moving the draw stop, will also be messing with how the back wall feels as well. A short valley will not allow shooters much wiggle room off the back wall before the string wants to lunge forward. Typically, bows with a shorter valley are more aggressive cams and tend to be at the higher end of the speed ratings, but this does not have to be the case. Generous valleys will almost make the shooter feel like they need to push the string forward from full draw to get it back to the resting position. So which is better?
Neither valley is really “better,” than the other, although there are pros and cons for each that shooters will have to choose between. A short valley will force shooters to have constant backpressure while holding on target. This supports good shooting technique, and should be done anyways because it will lead to better accuracy. However, there is no room to relax either. A string lunging forward is not fun, and can actually make shooters feel like their shoulder is being ripped out of socket. This creep may also lead to accidently punching the trigger, which is no good for the face after your release hand goes flying into it. For some, a short valley is worth the added speed and constant reminder to pull through the shot. For others, a longer valley is desired.
Long valleys give shooters some room to creep or not be as perfect with their form. Hunters moving around a limb or backing their face away from the target to get one last look for obstruction will not need to worry about the string wanting to jump forward. Shooters may feel a little more comfortable at the back wall because of this. However, shooters will not notice a slight creep forward. This may cause their form to suffer, or may be hard to keep a constant anchor point shot after shot since a little creep is not noticed. Longer valley bows are often a little slower in speed ratings as well.
The final decision on the valley will come down to what feels the best. A great way to test this is to draw the bow back (with an arrow nocked or course), and try to let the bow down. Does all the stored energy want to rip your arm off, or does it let down easily? Does the valley allow you to move your head away from the string and peek at the target, or does any relaxation at all force the string forward? Each shooter will have their own preference in which one feels the best. Manufacturers would not make different types of valleys if one were the “best.” Luckily, they leave the final decision up to the shooter.
4.6 Let-off
Compound bows use the cam system to help store energy efficiently. As the bowstring is drawn and the cams start to rollover, energy is stored in the limbs. This energy is eventually transferred to the flight of the arrow. With the cam storing energy in the limbs, the shooter is not responsible for holding the entire peek weight for the duration of the draw cycle. When the string has reached its maximum leverage, shooters will feel a let off, where they hold only a percentage of the peak draw weight. The higher the let-off percentage is, the less weight you will be holding at the back wall. Common let-off ranges from 65-85%, and several bow models can even be adjusted within that range to match a specific shooters preference. This adjustment usually takes place by changing where the draw stops are located (it will also impact how the valley feels as well). This actually has a lot to do with what shooters prefer while pulling in to the back wall because holding weight can impact form and ultimately accuracy, especially in hunting situations where the bow can be held for longer periods of time.
Let’s put this in perspective using realistic numbers for a better sense of what let off really means. Shooters drawing a 70-pound bow featuring 85% let off will only be holding 10.5 pounds at the back wall. However, shooters with 60-pound limbs and 65% let-off will actually be holding 21 pounds at the back wall. Although shooters chose a lighter maximum draw weight, the holding weight can actually be higher depending on the cam system and its featured let-off. This is something shooters should not overlook in the selection process.
Let-off also impacts the amount of energy stored. The higher the let-off percentage is, the less energy the cams are able to store. Because of this, speed also varies depending on the shooters let-off choice. Theoretically, a bow set at 65% let-off will fling an arrow faster than the same bow set at 80% let-off. Some cam designs will be more noticeable than others, but a difference may be seen. Like everything else with eccentric systems, the ultimate decision comes down to personal preference and what folks think feels the best, but it is something to keep in mind when making the decision.